Monday, June 24, 2013

Camtasia training - day 1 for Mac

When using Camtasia 2 for Mac, uploading with the built-in Youtube share function does not yield great results. Just like for Camtasia 8 for Windows, it is better to first save an MP4 file and then upload it:
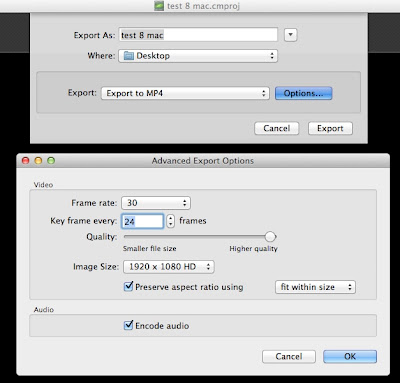
- In Share, choose Advanced Export. 
- Then choose Export to MP4 and click on Options.
- In options, choose the following settings:


Note: the image size is standard to most school desktops, however, you may want to play with this setting.


Jude

Camtasia Training - Day 1

\
The first issue was to determine the optimal settings for uploading a video to YouTube. It appears that the automatic sharing to YouTube  gives very mediocre results. Although you always seem to loose some of the definition, You can get a much better video quality by using these settings:

- Editing dimensions: 1280x1024
- In Produce and Share: Choose "Custom Production Settings" > MP4 Flash/Html5 Player>next>video settings: frame rate: 30 and slide from "smaller file" to "higher quality">next>next>finish.

Create a folder in your computer, as this last command will generate a number of files. However, the good news is that you will find among these files an MP4 file. Once you located it, just upload it to YouTube.

One more thing: it will take a few minutes for your youtube video to offer the highest definition option (HD720p) to viewer . As the default definition is of lower quality, you need to inform your viewers to select this option for optimal picture (see picture below).

See for instance this test. Never mind my voice comments, just look at the quality of the picture and compare with other formats, if you have the patience for that :)

Jude